The Document Object Model (DOM) is an interface for HTML elements which represents its elements as nodes which has objects in a tree-like fashion which can be modified in a scripting fashion by JS. The HTML DOM API adds functionality for manipulating HTML elements and advanced features like web workers.
The tree root always begins at the window, where the document object is then loaded under (when the document is loaded into the window [think your browser window]). Your html elements are then loaded under the document in the HTML structure you wrote.
Try using document.body right now on a web page (via your console) and see what prints out!
This is a DOM node. It is an object and as such has specific object properties to traverse its sisters/children and modify its contents.
Some terminology: Elements which are nested within another one are called descendants. Direct descendants are called children. Siblings are nodes which are at the same nested level, i.e. share the same direct parent.
One can traverse a DOM tree node via established object properties Source
Try out some of the above or these methods and see what you can access on your HTML web page of choice.
Note: The childNodes property may seem to return an array but it is actually a collection. To loop through it we need to use a for... of loop as it does not contain the native array properties. You should still be able to use the [] syntax to access its elements though.
Exercise: Given the below HTML structure. Just from the document.body, how do we access the <p> tag?
<body>
  <div>Hi!</div>
  <p>
    Example text
  </p>
  <div>End!</div>
</body>
Accessing elements directly
Instead of traversing the tree and finding the desired element, we may access elements direct via their id attribute . In fact this is a very common technique.
The most common method is to use the document.getElementById('YOURID'). You can also try the document.querySelectorAll('yourCSSSelector') which uses a CSS selector. You can also access collections from methods such as document.getElementsByClassName which return live collections which means it auto-updates as the DOM gets manipulated.
Now that we have a desired element, we can perform operations on it such as changing its styling and/or setting text!
Probably the most common thing you will see in vanilla JS is to add callback functions (handlers) to a node when an event such as a click is fired.
Once we get an node, we can get its and modify its text via the innerHTML property.
Exercise: Find a node with an ID and change its text.
We can also change the styling of a DOM node directly instead of using CSS. Think about the implications now that we can intertwine javascript with CSS! Although the better pattern is to add and remove classes to a DOM node, there may be edge cases where you want to set styling direct and manually.
Exercise: Find out how to style a node. Then learn how to add and remove classes from a node.
Conclusion
There are many other node properties you can find here in addition to many other DOM concepts. But in general this tutorial was more a conceptual exercise for you to understand how the browser loads a HTML document and how front-end libraries use these base methods to access & manipulate nodes. For example, you may realize how long-winded it is to access an element. Thus libraries such as jQuery ( $('#myDiv) versus document.getElementById('myDiv') ) have been invented to easier DOM manipulation.
As the BAR hosts many projects that turnover from student-to-student it is incredibly important not to only have a standardized application (the starter app I introduced), but also to document your code correctly. Today I will introduce JSDoc 3, the current de-facto standard for documenting your JS code. Fortunately, the format for JSDoc is similar to other documentation standards such as Python Docstrings. Some first steps that preclude documenting your code (as JSDoc doesn’t mandate naming conventions) is to use clear, explicit, and legible function, variable and file names. Also if your project is large and uses a framework such as a React, consider using multiple folders to contain your smart versus dummy components in a specific folder. The above principles apply compartmentalization and self-documenting code. However, self-documenting code is arguably an oxymoron, especially in your applications, as another student will have to parse through it.
In general you want to always being creating functions, as JS considers functions as first class citizens (remember callbacks?). Therefore you should always be documenting your functions.
The standard format to document a function with JSDoc:
/**
 * Multiply two numbers together
 * @param  {number} num1 - The first number to be multipled
 * @param  {number} num2 - The second number to be multipled
 * @return {number}      The product of the two numbers
 */
const addTwoNumbers = function (num1, num2) {
	return num1 * num2;
};
Some other options such as optional params, multiple variable types, or array params:
/**
 * Concantate two arrays together. Optionally, if a second array is not given, append a dummy array.
 * @param  {Array} array1 - The first array of items to be concantated
 * @param  {Array} [array2="[1,2,3]"] - The second array to be appended to the first
 * @return {Array}     - resultant concantated array
 */
const concatArrs = function (array1, array2=[1,2,3]) {
	return array1.concat(array2);
};
For more complicated functions, you should also include inline comments to explain what is also happening:
/**
 * Add two numbers together, type coercion if necessary.
 * @param  {string|number} num1 - The first num
 * @param  {string|number} num2 - The second num to be added
 * @return {number}     - resultant sum
 */
const concatArrs = function (num1, num2) {
    // parseFloat coerces type to floating number
	return parseFloat(num1) + parseFloat(num2);
};
Also note you can be more specific in your type tags. For example, if you create a class, you can denote an array of instances of that class instead of generic objects.
/**
 * Lorem epsum.
 * @param  {MyClass[]} arrayOfClasses - Array of my custom class instances
 * @return {number}     - Lorem epsum
 */
The final test to see if your comments follow JSDoc standards is to run the JSDoc documentation generator on your JS file. Install JSDoc globally on your computer via npm install -g jsdoc and then run jsdoc yourJavaScriptFile.js . You’ll get a HTML file you can then open in your browser. See github for more details.
Alternatively, I recommend trying out installing the JSDoc eslint plugin to your package to actively scan for the correct syntax.
Task: Document one of your more complicated functions (from your application). Verify it follows JSDoc standards (run the commands above). Then see if your fellow students understand what the function does. Refactor your comments if it doesn’t! Remember, you’re commenting to other people (and future yourself), not to a JSDoc compiler!
JS is single-threaded, it has one call stack and one memory heap. So it must finish the current frame in the stack before moving to the next. That is, if you have a long loop, the engine must complete the loop before going on to the next task. This approach is called synchronous (‘sync’) execution. Obviously for things like long loops we can use clever programming and efficient algorithms to not clog up the stack and delay the UX for the user. However, what about things we cannot control – like requests to 3rd-party webservices? We do not know when the response will return as we do not know how fast the server’s and client’s internet speed is. To combat this, JS engines have Web APIs (Application Programming Interfaces). During execution, those web requests are diverted to the browser’s Web APIs to be handled as to not block the main stack. Once the request is returned, the callback function (remember, a callback function is a function passed as an argument) is pushed back onto the stack. If you really want to get into the nitty gritty, you can look into event loop of JS engines. Here is a great video for understanding the architecture. If you’re really looking to be advanced, you can also look into micro- and macro-tasks (here and here). Today, we’ll take a look at what APIs are and making requests to them.
In JS. There’s one stack and one heap for execution. To prevent blocking, Web APIs can handle server requests and other tasks such that JS can incorporate async code. Once those requests are done, they get pushed to the callback queue and then the event loop pushes those callback functions get pushed to the main stack. Image credits
Application Programming Interfaces (APIs) and HTTP (HyperText Transfer Protocol)
APIs, more generally are an interface to facilitate communication between different programs. In web development, they’re almost always synonymous with externally hosted webservers that return defined values when queried with a set of parameters. That is, a client (you) sends a request with predefined variables at a URL over HTTP to a server. The server then does some calculation and responds back with a defined format (usually JSON [Javascript Objection Notation]). The preferred convention for APIs is to follow the REST architecture for making requests to servers. Usually a public API will have documentation for accessing its resources, however. Here at the BAR, we host many APIs for bioinformatic developers such as gene annotations, sequences, interaction data, expression data, and much more. For an example of a simple BAR API check out here: https://bar.utoronto.ca/eplant/cgi-bin/querygene.cgi?species=Arabidopsis_thaliana&term=AT3G24650 which returns:
The above structure is JSON which is really similar to JS objects except for double-quotes and some other rules. Once we get this data we can start immediately playing with it inside a callback function! Now you can see the power of the web programming! Imagine all the APIs you can use the combinations of those! The only downside is your app is now reliant on many outside APIs. Of course, you can also write your own APIs as an alternate to client-side calculation which I sometimes do if I feel the computation run-time is too intensive browser-side.
Note that when you go to a URL via a web browser it is almost a GET request. Meaning you are retrieving data from a web resource (almost always a web page). There are various methods in HTTP such as POST, DELETE, PATCH, and OPTIONS. But for most part you just need to know they exist and they modify the data you get back. Sometimes if the server is not set up to acknowledge that type of HTTP method, it will simply reject the request. For example, if you did a POST request to the above URL you would not get a response back. In fact, you will get an error… Remember those error codes whenever you try to upload an essay last minute? Some common HTTP codes:
200 = request OK
400 = bad request [ the server cannot understand your request format, change your query!]
401 = need authorization [ add auth code to your request ]
403 = forbidden
404 = not found [ server cannot respond at the URL requested ]
500 = server error
Whenever you submit a web request you will always get a status code above which can be useful during debugging.
Async programming (promises)
Now I will show you how to apply these principles and use those Web APIs. First you should really understand what goes on during an async call to a webservice. What would you expect would happen based on your knowledge in the intro based on the following JS code:
console.log('start');
fetch('http://dummy.restapiexample.com/api/v1/employees')
	.then(res=>res.json())
	.then(data=>(console.log('where will I print?', data)))
    .catch(err=>(console.log('error!', err)))
console.log('finish!');
Copy-and-paste this code into your dev tools, run it and see what happens. By the way, I am using ES6 arrow functions instead of the long-form.
The above uses the promises implementation of making web requests. If you want a historical background for why we use promises, look up ‘callback hell’. Anyways, browsers (and nodeJS) have the fetch keyword/function Web API to make requests to APIs. Fetches only need a URL as seen above to start making GET requests. From there, the Web API is cast off as seen above to work its magic. Fetches return promises. Promises can either resolve (status 200) or reject (server not found, other errors, etc.). When they resolve, they move onto the ‘closest’/next then handler to execute the callback code inside that then block (i.e. res => res.json() will be executed after our fetch is done). NOTE: JSON data MUST be parsed first with json() before performing tasks on it. You will then get your data in object literal form.
then handlers also return promises which allows promise chaining like seen above after we execute some code after res.json(). After code execution in the handler, it will return the return value, OR another promise’s result (usually after some delay of course) after resolution/rejection. Promise chaining will always receive the resolved/return value from the previous promise in the chain assuming success. That’s how we got ‘data’ from the then handler.
A then handler will ALWAYS return a promise. From here, code will be executed in the callback. Once done, it will either return a value to the next then hander, throw an error to be caught, or return a promise waiting to be resolved/rejected. Source: javascript.info
If a promise does NOT resolve, it rejects such that execution flow goes to the ‘closest’ catch handler in the chain. Put some weird characters in the above URL, what happens, what prints? Should we have multiple catches in our promise chain, what could its utility be?
Should we put synchronous code in another then block or perform all of it inside one block? I.e. let’s say we get some gene sequence data and want to calculate its codon sequence. From there, we want to see if it matches our domains of interest. Why or why not? I.e. should we chain it to be something like this:
fetch('genesequenceURL')
.then(res=>res.json())
.then(data=>{
  const codonSeq = calculateCodons(data)
  return codonSeq
})
.then(codonSeq=>{
  console.log('does is it have my domains', getDomains(codonSeq, 'zincfinger'));
})
If we are making multiple API calls, and one is dependent on another (say we need a gene symbol (via an API) to get its sequence), how would we make a promise chain to do such a thing?
Look up how we would make a POST request instead of a GET request via fetch, try it in your browser
Tip: Make sure your HTTP headers are set correctly during any non-GET request.
What is the utility of Promise.all ? Google the function (Google is a web dev’s best friend).
For UX purposes, say an API fetch rejects. Instead of printing errors, what is a user friendly way of displaying a failed API call?
For those advanced, look up async/await. I personally use async/await over classical promises but it is really just syntactical sugar.
As some of you will be working on your own independent projects it will be good to give you advice in terms of how to develop for the web and what standards we use the for BAR. First we should install a few things on your local dev machine:
Text Editors:
WebStorm (students get a free trial) for those who prefer an IDE experience and have more RAM)
Suggested plugins (install via webstorm > preferences > plugins):
Node is a javascript runtime environment that can be run without a browser, so you can run code like this node myscript.js just like a python script. Test you have it running by using node --version.
This tutorial series covering javascript assumes you have prior scripting knowledge and refines your ability to think in a web-based/javascript way. That is, some syntax and basic programming paradigms will be covered but will not be the focus on this series. JavaScript, its accompanying libraries and runtime environments have come a long way but in this series I will teach you the foundations of vanilla browser-based JavaScript to help you understand the intricacies of this language. It’s also much faster to get going!
JavaScript (JS or js) is one part of the successor to Flash-based websites. It is the language and logic that allows for dynamic web-pages to come alive (although CSS can do some fantastic things on its own) such as instant messaging, sending a form, making a payment, and much more. Think of it as the painter of the canvas with constructed rules (logic/syntax) on how to paint and repaint on the webpage. She can also erase the some of the webpage (i.e. delete HTML elements) directly. It was created by Brendan Eich in the 90s in 10 days in the spirit of Java but has little to do with Java, in fact classes were not a thing until recently.
Fundamentals and Architecture of the language:
High level language that was made for browsers, does not typically have access to CPU/RAM
Weakly-typed, i.e. you don’t need to declare what a type a variable is
All numbers are floating points FYI
Prototypal inheritance versus your traditional class-based inheritance (advanced, but FYI)
Can be thought of as interpreted but there are just-in-time compilers and modern JS bundlers that ‘transpile’ JS code (advanced)
Memory garbage collection automatically handled
Functions are pass-by-value and pass-by-reference(hotly debated, let’s not argue!)
Single threaded, but has asynchronous control via ‘Web-APIs’ (important, covered later)
Libraries (or modules in other languages) are often UI-based due to the web-nature of JS
See here or here for some more differences and history
JS Basics
Before we start you should code-along with either your browser dev tools console (press F12 on Chrome) or use something like REPL which hosts a browser-based javascript runtime for you.
PS: Useconsole.log("my text", var1); to debug for now
Before you begin, you should know… Just like python there are differences in testing equivalency in JS, most prominently displayed by the ‘==‘ and ‘===‘ operator. == uses type coercion to try to figure out if two values are the same for a primitive, can you think of an example of a string and number (psst, test it!) that returns true using ==? === however is more strict and tests for type and value equivalency. For objects (i.e. non-primitives), both operands are treated the same and reference checks are made.
var imANum = 5.01;
var alsoaNum = 5;

var string = "yolo";
let string1 = 'FOMO';
let templateString = `I ${string} because I got ${string1} !!!111!`;

const justABoolean = true;

const hiImNull = null;

var wellImUndefined = undefined;

var obj1 = { country: "Mozambique", continent: "Africa" }
var obj2 = { country: "Azerbaijan", continent: "Asia" }
var obj2 = { country: "Azerbaijan", continent: "Europe" }

const sym1 = Symbol("hi");
const sym2 = Symbol("hi");
A few things…
Notice how arrays/lists (we call them arrays in JS, they have list-like and array-like properties) is not a type unlike other languages? Arrays in are objects in JSland with special properties given by their prototype chain such as ‘length’.
Functions are also objects. First-class objects in fact which means you can play around with functions just like a typical variable! For example you can pass a function as an argument to another function (the passed function called a callback function).
undefined usually means that the variable has not be assigned a value. null is almost always an assignment value.
We use typeof operator to identify the object type. Try it!
For those who are familiar with Python (i.e. all of you), fill in the blanks: A JS object can be analogous to a ______________ (python type) and has pairs of __________ (property names) and ___________ (property values).
Can we figure out which data types return truthy or falsy values?
Hint: Conditionals are written like so if (2 > 1) { console.log('true') }
I’m actively listening check-up: Should two empty arrays assigned independently return true when they’re checked for equivalency via ‘===‘?
What does templateString print out?
These are template strings and are much more terse way of interpolating variables than the old-school way of concatenating strings together.
Symbols are an esoteric primitive data type are unique identifiers, it is mostly used for object property names.
Notice how we declare our variables with ‘var‘, ‘const‘ or ‘let‘?
var is a classical way to declare variables that is either globally or functionally scoped; it can be re-assigned to another value
let is similar however is lexically scoped (fancy way of saying the variable is scoped within a curly braces ‘{ }’)
There’s also some differences in how each variable is “hoisted” inside a function to be used; var variables are brought to searched for and hoisted to the top of the function
Can you think of this local vs functionally scoping where this can be an issue? Hint: Think of for loops, for those are who are advanced, look up the ‘closure issue with var’
const is the most unique declaration in that the variable value cannot be changed by direct assignment (what do I mean by this?); it has similar scoping rules as ‘let‘. See how I reassigned obj2 easily but can you try reassigning justABoolean to false?
Up Next
This week’s workshop may have been a bit simple as some of you may already have experience scripting and simply see it as a programming syntax-workshop but soon we will dive into the intricacies of JS and how it operates the browser via the Document Object Model (DOM) !
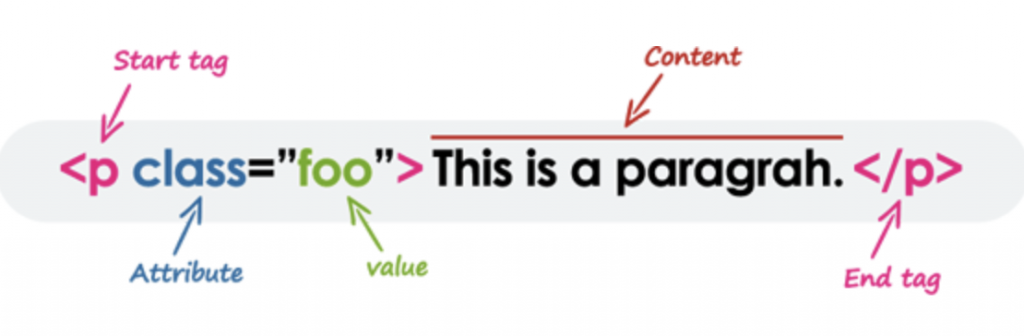
HTML (HyperText Markup Language) is a type of declarative (i.e. we tell the browser what it should do – not how to do it)markup language that is specially designed to be parsed by web browsers. It can be thought similar to XML (eXtensible markup language) in that there are descriptive tags which tell the browser (and coders) what the enclosing (or nested) tags will contain and that there is often deep nesting (i.e. grandchildren and grand-grandchildren tags). What is really cool is that all the webpages you see are made from HTML (sometimes generated dynamically by scripting languages; but this is too advanced for now). These tags such as <p></p> are not shown directly by the browser but rather what is contained directly inside the tags (note that a tag must be enclosed by a ‘/’). To be clear, there is a semantic difference between tag, and element and sometimes they will be used interchangeably. Formally, an element includes the opening/closing tags, content between and any assigned attributes (see below). This element has semantic meaning which the browser will interpret and display. For example h3 is supposed to be a header element of fair importance.
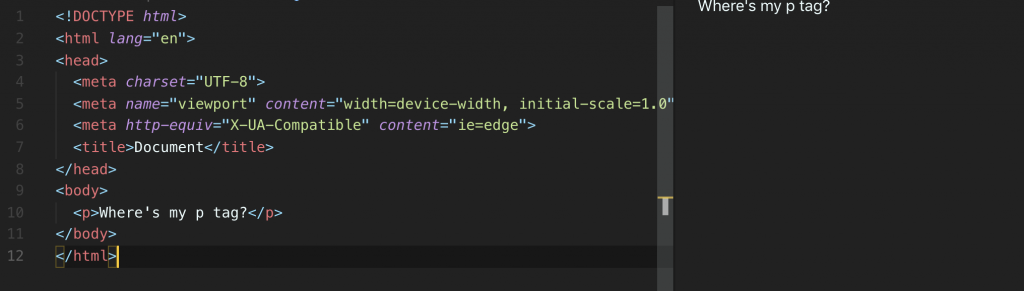
An element has many components, one of which is its opening and closing tags. It can also include content and attributes which will modify its functionality and words displayed. CreditsThe tags almost are always descriptive and tell the browser how it should show something, and that it should not be shown explicitly (text-wise). The text editor I am using here is VSCode and the pane on the right is a live rendering preview of the HTML on the right from this plugin. Note the nested of tags, and that the editor automatically indents it for you.
Hint: if you type ‘!” in a html file in VSCode, it will automatically populate your file with some standardized tags for writing a web page!
From above you can see most of what we wish to write to the browser exists between the body tag which is actually also a child (nested) of the html tag (some editors choose not to display the indentation for brevity). Stuff inside the head is usually boilerplate but sometimes contains links to external resources or our own scripts and styling.
Note some tags can be self-enclosing and some can do not show text but rather a graphic (by default – you can change this via CSS; more later) like a horizontal rule <hr/> tag.
Featured is a CodePen which is a web-based HTML/CSS/Javascript live editor which has many useful features such as syntax highlighting, script loading and pre-rendering engines. For this tutorial I made a collection, the above project is here.
All in all there are many elements in HTML and they keep on growing with each spec! The current spec is HTML5 which has elements such as header, article, summary which clearly tells the browser, web-crawlers, and coders what the nested elements/content inside the tag represent! Hint: You are writing an HTML5 document when you using <!DOCTYPE html> at the top! There are simply too many elements to list so I am going to explore one element that is often-used.
Input element and HTML attributes
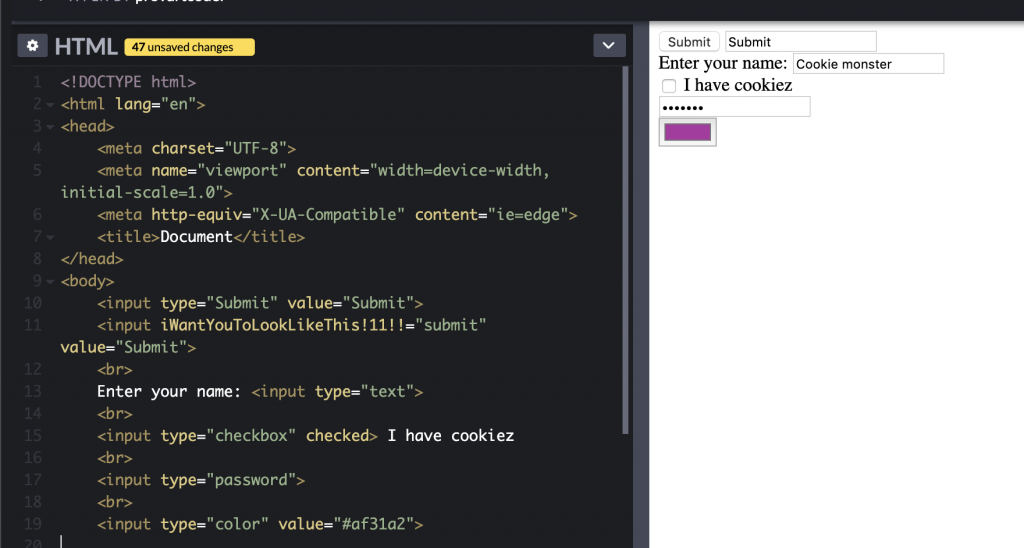
This element is most often used in forms as users are choosing some call-to-action. The great thing about this element is that it can take many forms just by changing one attribute! Remember above is our anatomy of an element that inside the opening tag of an element, a developer can set certain attributes which will change how the browser will interpret and render the element. This is none-better displayed than using an input tag which can take many type attribute values. Note that the browser has predefined attributes such as type for <input> tags such that creating an attribute named ‘iWantYouToLookLikeThis!11!!’ to Submit won’t render that element to become a button. Remember to enclose those attribute values with quotes!
Note that the input tag can take on many forms based on the type attribute, but the main lifting is done by the browser as it knows how to interpret the ‘type’ attribute. If you set your own tag like above, it won’t be interpreted – however this can be useful if you wish to have your own attributes for latter parsing. Codepen
There are many ‘browser-defined’ (based on the HTML spec) attributes, some specific to certain elements and some very ubiquitous like the id and class attribute. These attributes allow us declare an element by a unique identifier and/or by a collection (for which there is some commonality). The usecases for these attributes is to allow us to specifically target an element for scripting/styling or modify many elements. Another common pattern you will see web developers use is to add or remove classes to an element which will dramatically change its styling. How do we change a styling just by adding and removing classes? Good question, let’s introduce CSS!
CSS (Cascading Style Sheets)
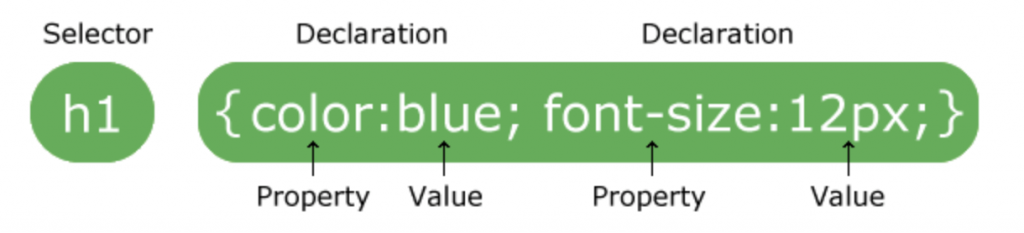
CSS describes how HTML elements should be displayed on media. A stylesheet is a composed of a bunch of rules of how your elements should look like. It is called cascading because you have many external CSS files in one HTML document which may or may not overlap each other. At the base of all how CSS works is that it targets specific elements via selectors that you create and describe. Inside the selector are your style property and values. I’ll be covering the three main ways to inject CSS into your HTML document: inline, internal and external. In reality, almost all modern styling is done via external stylesheets and are imported into the project as needed as it allows compartmentalization and is the most liberal.
A basic CSS rule for how h1 elements should be displayed. Credits
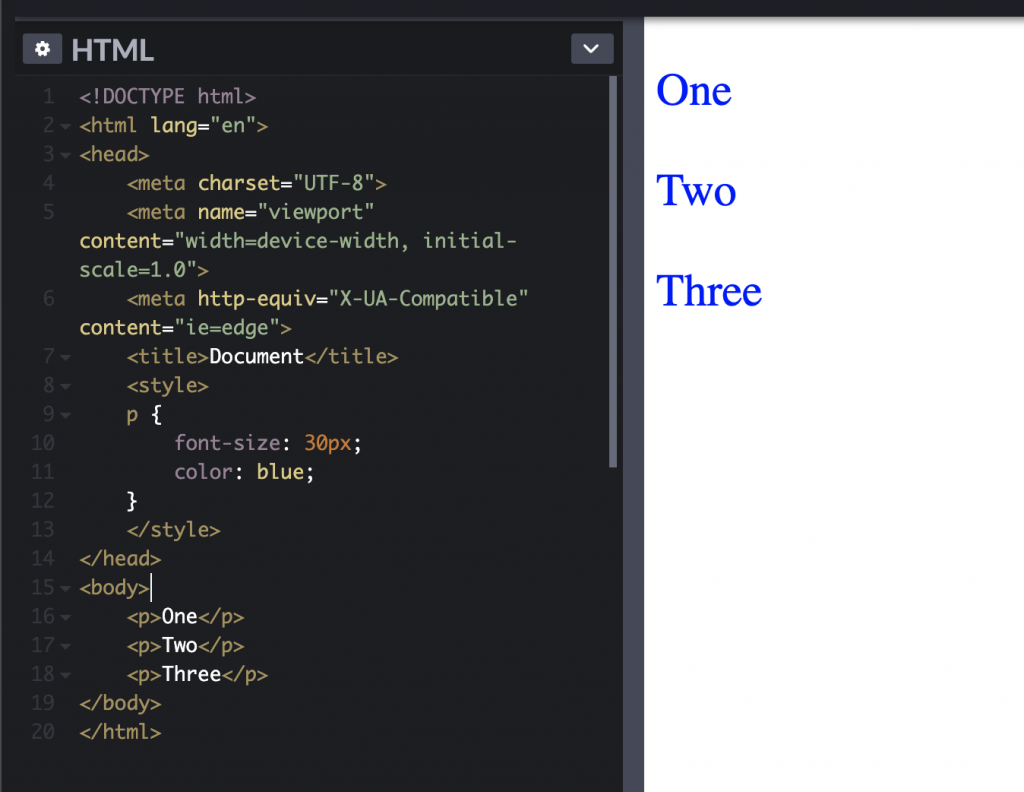
Internal Stylesheet
This is where you set a stylesheet the HTML document so you do not need to load in an external stylesheet. There can be certain usecases for this such as if you want to lower the amount of web requests to your server but is fairly out-of-date. Anyways, you use a style tag inside the head tag of your HTML doc and simply write your rules there.
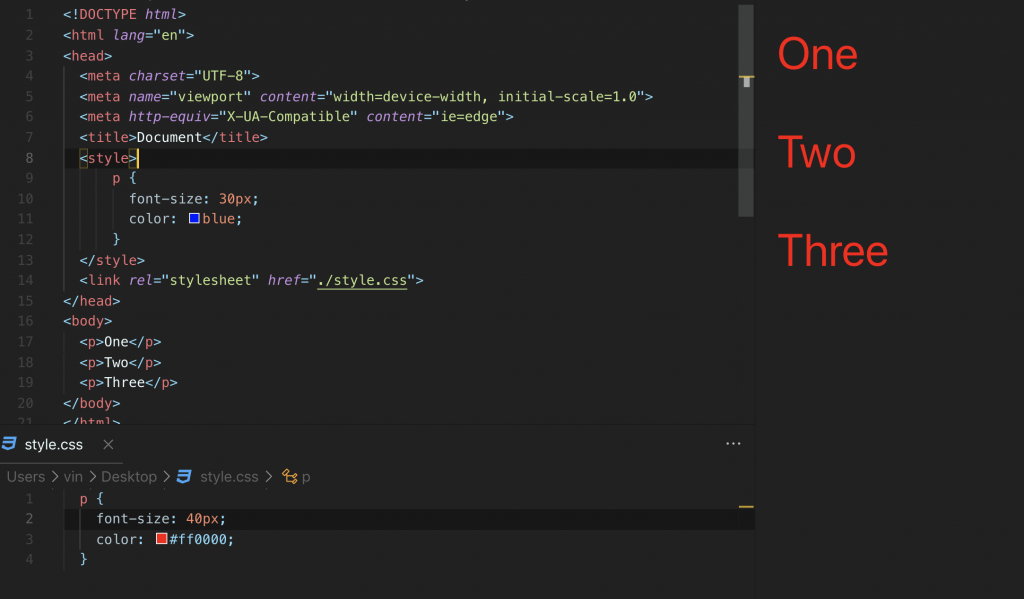
This is where you write a stylesheet (.CSS file) and import it to the HTML file (it needs to know the path of the CSS/stylesheet file). Whether an internal or external stylesheet overrides another (at the same specificity level – more later) depends on which comes after each other in the head tag. See below.
Note that the internal style sheet was overriden (i.e. cascaded over) by our external stylesheet we set later in the head tag. Note this is only for the same level of specificity.
Inline Styling
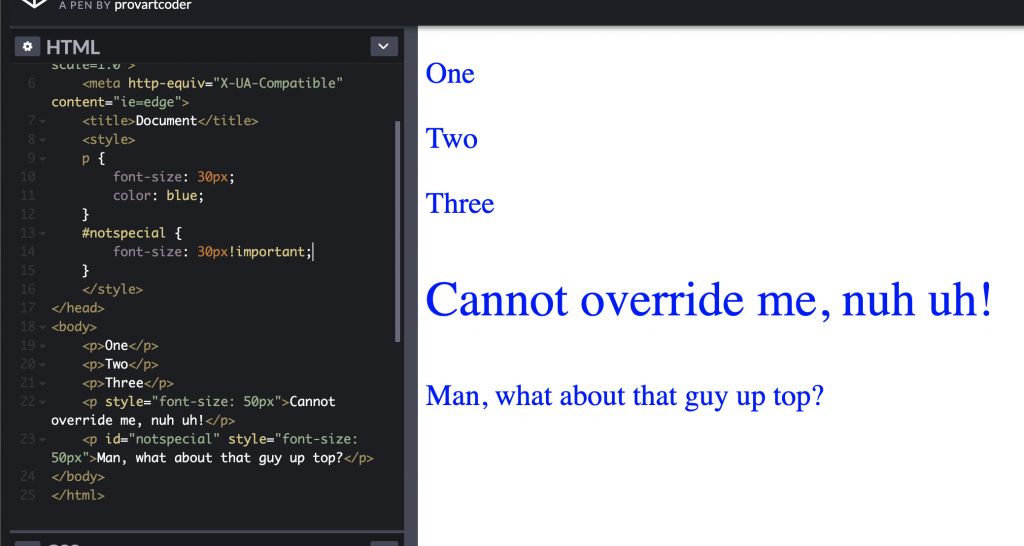
The most controversial of the bunch because any styling set here cannot be overriden other than with an !important flag added to the end of a CSS property (before the semi-colon). Try below in the codepen. It is controversial because developers easily set styling via scripting when generating HTML on the fly and become CSS-independent. However this makes it a huge hassle for future developers/designers who have to write many !importants. Some argue that is a good thing as it couples a scripting function with its styling with how it was meant to originally look like as there can be dozens of CSS files in a given webpage (i.e. increase reusability). I suggest you avoid this for now unless you have a good reason to use inline styles. Note how we also don’t need to use selectors here because we are just telling the browser to make this element look this way?
Inline styling has its pros and cons, note the last two tags. One cannot be overriden by a CSS file whilst the other is because an !important tag is focused on it via a selector. Use !important sparingly. Codepen
CSS Selector Specificity
If you walked through the above carefully you would have noticed that elements are targeted by CSS via selectors and some can be more specific than others. If a CSS selector is more specific than another, that CSS property (if they are competing for the same property such as ‘color’) will ‘win’ and override the other styling. Hence you should know the CSS selector priority rules and how to create selectors. In general, for CSS you want to use the classes attribute (note one element can have many classes – this is space separated).
Oh yeah, we use ‘.className’ and ‘#id’ in CSS to differentiate between the two in our selectors. Also remember you should really only have one unique id name in your whole webpage. When scripting use a number iterator to append to your id if you need to.
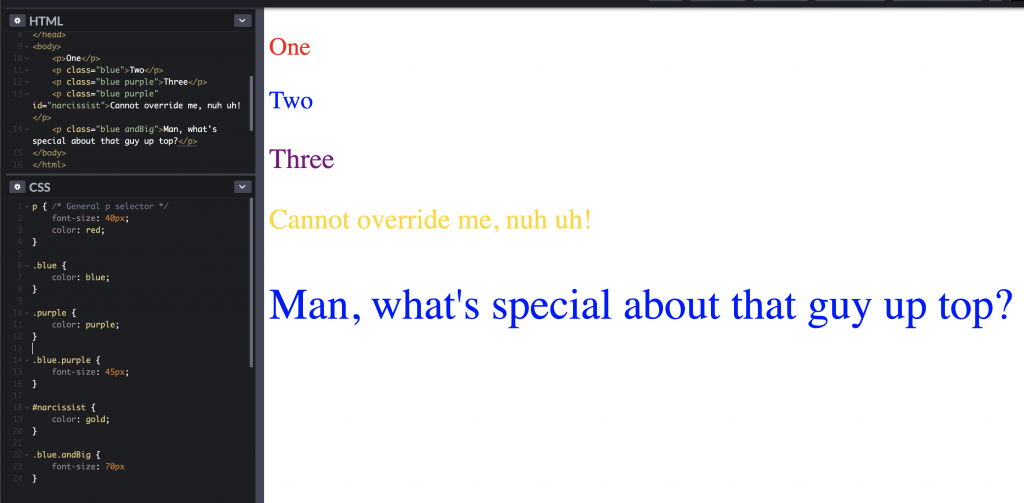
There are essentially 3 (really 4 if you include in-line styles) types of styling specificity you can write an CSS selector with: id based, class based, and element-based (targeting all p tags for example). Imagine we have a counter that by default is like this 0 0 0 from highest specificity from right to left. These counters represent how many respective (from above) selector types are in a given element. For any given element and its many given CSS selectors, if there are competing properties (like colour below), the one with the greater number will ‘win’ where the rightmost number is given first priority. That is, 0 20 0 would lose to 1 2 0 but 1 20 0 would win if it faced 1 19 0. Note the below Codepen and its multiple CSS selectors. Does this all make sense to you? Ask yourself these questions:
Why does the font-size CSS property apply to ‘one’ ‘two’ and ‘three’ when there is a stronger selector (i.e. .blue)?
Why is ‘three’ purple and not blue?
Why is the fourth p tag gold?
Can you make that #narcissist a poop-brown (color: #7A5901;) – what selector would you use?
Why does almost everyone suggest using classes for the vast majority of styling rather than ids? Hint recall our counter above and what is the most specific thing.
Remember how HTML is nested? It is not just for semantic reasons! Elements can inherit their parents’ styling properties. Generally, it inherits the closest parent’s styling. These inherited styling can be overriden by writing your own rules above. If you are messing with your own webpage I suggest you use your browser’s dev tools, inspecting an element (right click on it) and modifying its styling directly rather than constantly making small changes to your CSS file! The resources for HTML and CSS are vast so I will let you explore on your own. But remember that learning by doing is one of the best ways to do things. I can’t recall all the types of input, but I know it is an incredibly useful element due to my constant fiddling with its attribute! HTML/CSS is very much the same, the resources for attribute types/values and CSS properties are definitely out there.
An operating system (OS) can be thought of two components, the kernel and shell. The kernel is the core of the OS and handles low-level operations such as starting/ending processes, and allocating memory when you open and close your browser. Jointly, the shell is a program that can send very direct, specific commands to system tasks.
The Shell is a way of making (safe-ish) commands to the kernel which will handle low-level tasks for you. Credits
For example, listing all your files in a directory by their date modified. You could have a Graphical User Interface (GUI) program that could do this (finder, explorer) but some commands are so specific that is up to you for figure out how to create the specific command! BASH (Bourne Again Shell) is a shell that is most commonly used in bioinformatics and in programming in general. Mac Users already have BASH installed (open ‘Terminal’; although this may be Zsh soon). Windows users can open up install Ubuntu which has BASH. Alternatively you can login into a Linux server like the BAR or SciNet using PuTTY. Just note that when you login to a remote computer you are accessing that computer’s files!
Essential Commands
Navigating your place
ssh -p 22 neo@thematrix # login as neo to the remote matrix server under port 22 (usually the ssh port), use password prompt

ls # print all files/locations less hidden
ls -a # print all files including hidden
ls -l # print extra info
ls -al # combine logic above
ls my-directory-somewhere-else/stuff # print stuff in other path

pwd # print current directory dir in absolute path

mkdir # make a folder in current directory

cp doc.txt doc2.txt # make a copy

rm file.txt # delete file, PERMANENT

mv doc.txt ../. # move this file to the parent directory

whoami # print current logged in user
Notice how ls -al I was able to (1) use flags to change the output of the command and (2) combine the flags to give me even more control. In general flags are a gigantic part of running shell commands (and bioinformatics programs) and you should get familiar with flags by checking out each commands man page by using man ls for example.
File permissions
One concept you should understand (among many) is that files may be readable (r), writable (w) and executable (x). And that these specific permissions can be assigned to Owner (usually a sys admin), Group (list of special accounts) and Others (all users) respectively. You can get the file permissions by using ls -l. You can also change the permissions using chmod #chmod 777 myFile.txt. Cleverly, the permissions to the above groups can be summarized in a binary number (see below).
Use chmod to change the permissions of a file. Moreover you can easily set the rwx permissions for each user type by using a binary number that summarizes the rwx on/off permissions. Credits
That being said, we should have made the BAR fairly secure in that you cannot delete others’ or sensitive files but always make sure you are know what you are doing because once you delete something in bash (using rm), IT CANNOT BE UNDONE!
String processing (Intro)
One of the largest advantages of using BASH is its powerful arsenal of string manipulation tools such as being able to quickly split fields (columns) of a comma separated values (CSV) file into a more workable format and using regular expressions to parse and replace text efficiently. I highlight this for those undergraduates who will be doing a lot of text/data parsing (working with DNA sequences, large tables [CSVs] for example). For those students, look into tools such as:
head file.txt #print top lines
tail file.txt #print last lines
vim newFile.txt #use the vim text editor to edit your file
nano newFile.txt #use nano text editor
grep 'word' file.txt #find 'word' in your file and print the lines, NB many options here!
sort file.txt #sort this file, according to your criteria
diff file1.
txt file2.txt #print the different lines in this file, very useful for code merging (like git merge)
Shell Scripting
You can write shell scripts (files ending in .sh) that are quite useful for automating tasks. Moreover for those using a cluster you will need to write simple shell scripts that will need to be executed. Here is an example shell script but know that you can also run these commands line-by-line in your console. The first line is a shebang tells what shell to execute the script with. Note that the syntax for shell scripts is very strict so be patient.
Combine output of one command to another using ‘|’ (pipe). The below code takes the output of ls and prints the top 5 lines/files. A usecase for this may be if you have a large directory and don’t want a large output.
ls -l | head -5
Write the output of a shell command (or multiple like above) to a file using ‘>’. Below makes a text file with current date.
date > example.txt
For those running code that may take a while (and IS NOT using a job submitter on a cluster like SciNet), you can run a screen and allow that process to execute. When it is finished you can return back to the screen. Alternative it is quite nice for going back to where you left off earlier. I use this to run simple webservers sometimes, I go to that screen when I need to debug HTTP requests.
screen -S running_my_long_python_job This will start a screen which you can execute your python script, then detach from and logout from your server via Ctrl+ad and exit respectively.
Set alias for commands you use a lot.
alias lsal="ls -al" This will set an alias such that when you execute lsal it will execute the right hand assigned command. Note that this will get erased after you exit your session. To set it permanently you should modify your .bashrc or .bash_profile which gets run everytime you re-enter your shell.